A practical guide for founders and product teams who have an idea — and need a physical prototype in their hands.
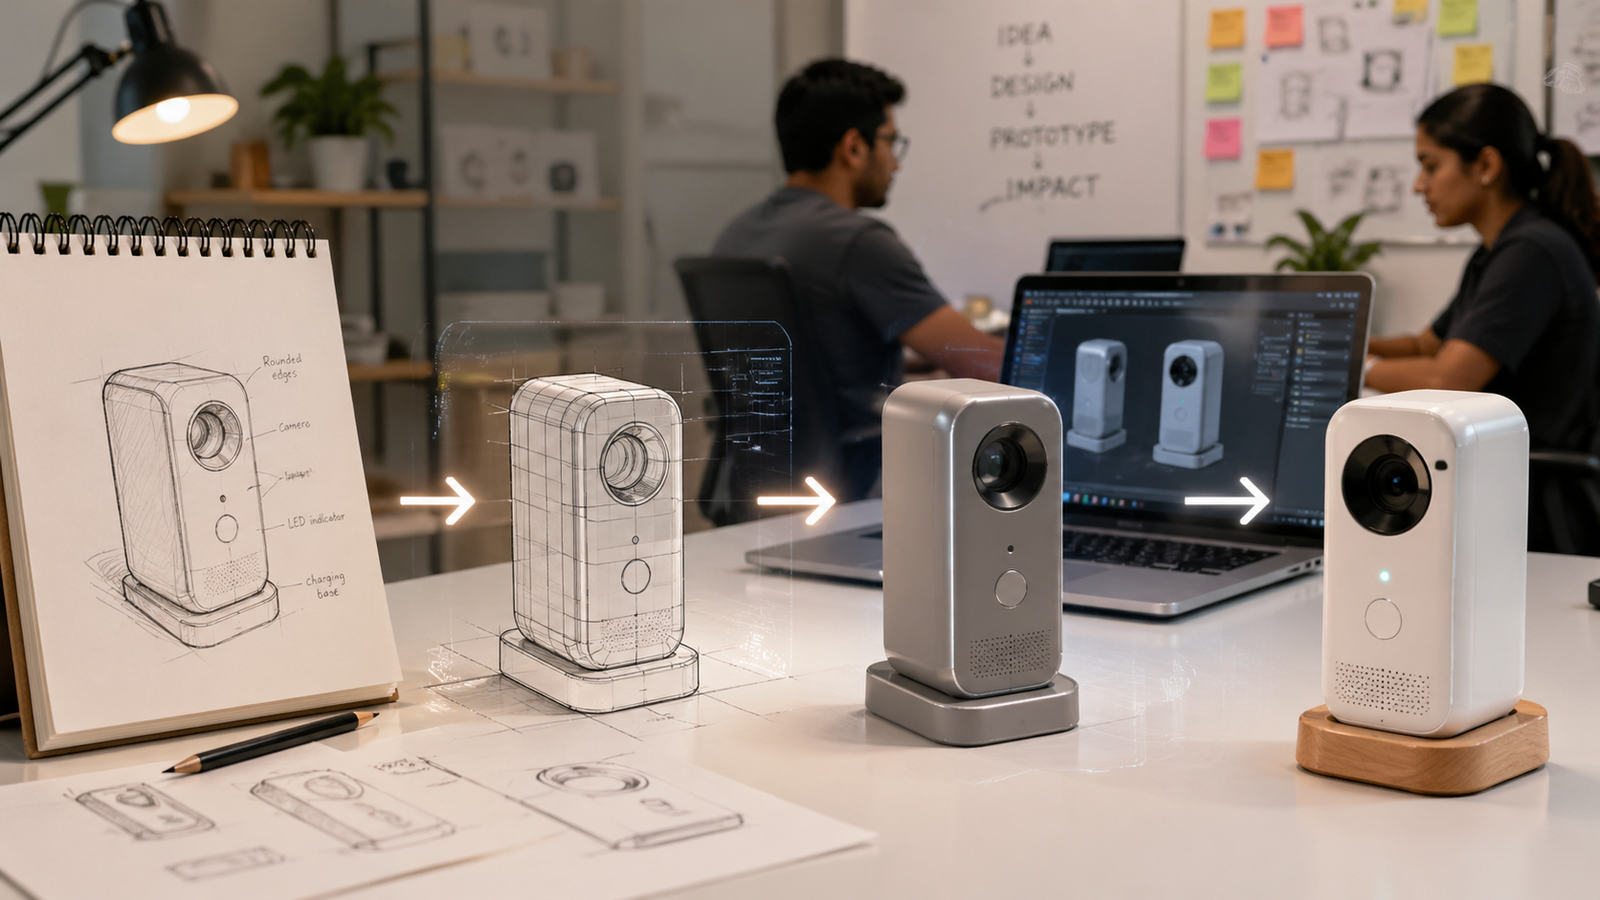
Every physical product in the world started as a sketch — on paper, on a whiteboard, or the back of a napkin. The gap between that sketch and a working prototype is where most early-stage startups lose weeks, burn money they did not need to spend, or give up altogether.
It does not have to be that hard. The prototype journey has a repeatable structure. Once you understand the five steps, you can move from idea to physical object far faster than most first-time founders expect — with far less guesswork along the way.
This guide walks through each step clearly: what happens, what decisions you need to make, and where things typically go wrong. Whether your product is a consumer gadget, a mechanical component, a medical device, or an industrial tool, the process follows the same path.
📌 Who This Guide Is For
Startup founders with a product idea but no engineering background
Product managers preparing a concept for hardware development
Designers and inventors who need to turn a sketch into something physical
Anyone who has a working idea but does not know where to begin
Step 1: Define What the Prototype Needs to Prove
STEP 1 — Define Before You Design
The most expensive mistake in prototyping is building the wrong thing for the wrong reason.
The first question to answer is not what your product looks like — it is what this prototype needs to prove. That distinction matters more than most founders realise, because there are fundamentally different types of prototypes, and they require completely different levels of investment, precision, and time.
A looks-like prototype demonstrates the appearance, size, and shape of the product. It is made to show investors, gather early feedback, or validate aesthetics. It does not need to function. Common materials include resin, foam, and 3D printed shells.
A works-like prototype demonstrates the core function of the product. It may look rough but must perform. It is used to validate mechanisms, electronics, or structural behaviour. The materials vary depending on what needs to be tested.
A looks-like and works-like prototype combines both — it is the full pre-production prototype, used for investor demonstrations, manufacturing quotes, and regulatory submissions. This is expensive to build correctly and is usually reached at Step 4 or 5 in the journey, not at Step 1.
Starting with a full production-quality prototype when you only need to validate a concept is one of the most common ways startups exhaust their first engineering budget before they have learned anything useful.
What to Do at This Step
• Write one sentence: this prototype needs to prove that...
• Decide whether you need looks-like, works-like, or both
• Define the minimum set of features that must work for this test
• Set a budget and timeline for this version — not for the finished product
• Identify who will see this prototype and what decision it needs to drive
Step 2: Turn Your Sketch Into a 3D CAD Model
STEP 2 — Sketch to CAD
Your sketch becomes precise, manufacturable geometry — the foundation of everything that follows.
A sketch, no matter how detailed, cannot be manufactured. A 3D CAD model can. The conversion from concept drawing to digital geometry is one of the most critical steps in the entire process, and it is where most non-engineers hit their first wall.
CAD stands for Computer-Aided Design. The software creates a precise digital solid of your part — every dimension is defined, every surface is geometrically correct, every feature such as a hole, a thread, a slot, or a snap fit is modelled with the accuracy required for real-world manufacturing.
Once a CAD model exists, it enables 3D printing directly from the file, CNC machining with toolpath generation, vacuum casting with master pattern preparation, engineering analysis for stress and thermal loads, manufacturing quotes based on real geometry, and investor renders for presentations. It unlocks every downstream step.
You Do Not Need to Know CAD to Get Started
A professional 3D modeling service can build the model from almost anything you can provide. That includes hand sketches with approximate dimensions, PDF or DWG engineering drawings, reference photographs from multiple angles, a physical object that needs to be reverse-engineered, or simply a written description alongside a few reference images. The more information you provide, the faster and more accurately the model is built — but you do not need a complete drawing to get started.
What to Include When You Send Your Brief
• A sketch or drawing — even rough is fine, annotate any dimensions you know
• Reference images — photos of similar products, objects showing shape or intent
• At least one key overall dimension — length, diameter, or height
• Material intent — metal, plastic, rubber, rigid, flexible
• End use — how will this part move, attach, seal, or connect to other parts
File Formats You Will Receive
Your CAD modeler will typically deliver a STEP file for CNC machining and manufacturing, an STL or 3MF file for 3D printing, and the native editable file in SolidWorks or Fusion 360 format for future revisions. For visualisation and investor presentations, OBJ or rendered images are also standard deliverables.
Step 3: Choose the Right Prototyping Method
STEP 3 — Select Your Process
The method you choose depends on quantity, material, budget, and what you need to test.
Once you have a CAD model, you have three primary paths to a physical prototype. Each has different cost profiles, lead times, material options, and suitability for different stages of development. Choosing the wrong method at the wrong stage is a common and avoidable expense.
3D Printing — Best for Early Iteration
3D printing is the fastest and most affordable way to get a physical object from a CAD file. It requires no tooling, and revisions can be printed within 24 hours. There are three main technologies to know about.
FDM, or Fused Deposition Modelling, produces tough and low-cost parts with visible layer lines. It is well suited for structural tests, large parts, and early fit checks. SLA, or Stereolithography, produces smooth surfaces with high detail but parts are more brittle. It is best for cosmetic prototypes and fine features. SLS, or Selective Laser Sintering, produces strong nylon parts with no support structure marks. It is the best choice for functional assemblies that need to move or flex.
Typical lead time for 3D printing is one to three days. Cost per part is low. The material range is limited compared to machining, but for early-stage validation it is usually more than sufficient.
CNC Machining — Best for Functional Testing
CNC machining cuts parts from solid blocks of real engineering material — aluminium, steel, brass, nylon, or Delrin — with high dimensional accuracy. When material properties matter for your test, when tolerances are tight, or when surface finish quality is needed for presentation or functional testing, CNC is the right choice.
Use CNC when a 3D printed part cannot give you the answer you need. If you are testing a structural load, a bearing fit, a sealing surface, or a thermal condition, the material and accuracy of a machined part is what makes the test valid.
Typical lead time is three to ten days. Cost is moderate to high per part compared to 3D printing, but the quality of information you get from the test is proportionally higher.
Vacuum Casting — Best for Small Batches
Vacuum casting produces low-volume batches of five to fifty units in production-like materials. A silicone mould is made from a master pattern — usually a high-quality SLA 3D print — and polyurethane resins are then cast into it. The resulting parts closely resemble injection-moulded output in look, feel, and surface finish.
Use vacuum casting when you need a consistent set of parts for investor demonstrations, user testing, or a pilot distribution. It bridges the gap between a one-off prototype and the full commitment of injection moulding tooling, which costs tens of thousands and requires a finalised design.
Typical lead time is one to two weeks. Cost per part is low when spread across a batch of ten or more. The minimum practical quantity is around five parts.
Step 4: Test, Break, and Iterate
STEP 4 — Test and Iterate
The prototype is a question. Testing gives you the answer.
Your first prototype will have problems. This is not a failure — it is the point of the prototype. A prototype is a physical question you are asking about your design, and testing gives you the answer before those problems reach production where they cost ten times more to fix.
Most startups under-test their first prototypes because they are anxious to move forward. The result is that issues which would have taken a day to fix at the CAD stage become issues that take weeks and thousands of dollars to fix after tooling has been cut or a production order has been placed.
What to Test
• Fit and assembly — do parts go together as intended, and do clearances work correctly
• Function — does the mechanism, hinge, clip, seal, or moving part do what it should
• Structural integrity — does anything flex, crack, or deform under expected load
• User experience — does the size, weight, and grip feel right in real hands
• Manufacturing intent — can this part actually be produced the way you intend to produce it
How to Document Your Iterations
Keep a simple revision log. For each test round, record what was tested and what the result was, what changes need to be made in the CAD model, what revision number this represents, and what the next prototype needs to prove. Without documentation, you quickly lose track of which version worked, what was changed, and why.
A well-managed prototype process typically runs two to four revision rounds before reaching a production-intent design. Each round should answer at least one clear question. If you are building the same prototype twice without changing anything, you are not iterating — you are spending.
Step 5: Prepare for Production
STEP 5 — Production-Ready Handoff
The prototype becomes the reference. Everything downstream depends on this file set.
Once your prototype has passed testing, the work shifts from building and testing to documenting and specifying. This is where many startups discover that their prototype files are not in a state that any manufacturer can actually use.
A production-ready design package is not just a 3D file. It is a complete, unambiguous specification that any qualified manufacturer in any country can quote from, build to, and inspect against — without needing to call you for clarification.
What a Production-Ready File Package Includes
• STEP files for every individual part
• 2D engineering drawings with tolerances, material specifications, and surface finish requirements
• A Bill of Materials listing all parts, quantities, and any purchased components
• An assembly drawing showing how parts relate to each other
• Design for Manufacturability notes covering anything a manufacturer needs to know
• A revision number and date on every document
The DFM Review
Before submitting files to a production manufacturer, a Design for Manufacturability review checks that your design can be produced efficiently at volume. DFM stands for Design for Manufacturability and it is the practice of checking that what you have designed can actually be built reliably, repeatably, and within budget.
For the DFM review, wall thicknesses need to be appropriate for the chosen material and process, features need to be accessible by standard tooling, tolerances need to be achievable without specialist equipment, part geometry should not require unnecessary operations, and the assembly sequence should be logical and repeatable by anyone on a production line.
Skipping this review before sending files to an injection moulding or CNC production supplier is one of the most expensive mistakes in hardware development. Mould modifications and production rework cost far more than a CAD revision at this stage.
🚀 Signs Your Design Is Production-Ready
Every part has a STEP file, a 2D drawing, and a revision number
All tolerances are specified — not just the critical ones
Material and surface finish are written down, not assumed
A manufacturer who has never spoken to you could quote and build from this package
You have a signed NDA with every supplier who receives your files
The Full Journey at a Glance
Here is how the five steps map to a realistic timeline for a moderately complex single product:
• Step 1 — Define the prototype brief: one to two days
• Step 2 — Convert sketch to 3D CAD model: three to seven days
• Step 3 — Produce the first physical prototype: one to ten days depending on method
• Step 4 — Test and iterate through one to three revision rounds: one to four weeks
• Step 5 — Prepare production-ready file package: three to seven days
A straightforward product with a clear brief and one revision round can reach a production-ready state in as little as four to six weeks from the initial sketch. More complex products with multiple components or integrated electronics typically take eight to twelve weeks through the full iteration cycle.
5 Mistakes Startups Commonly Make on the Way to a Prototype
Building production quality too early. Your first prototype is a test, not a product. It does not need to look perfect — it needs to answer a specific question. Over-investing in the first build delays learning and burns budget.
Sending a sketch without any dimensions. A CAD modeler cannot produce accurate geometry from a drawing with no measurements. Annotate your sketch with at least the key overall dimensions — length, width, height — before sending.
Choosing the cheapest process regardless of what is being tested. A 3D printed prototype in PLA cannot tell you how an aluminium machined part will perform under load. Match the prototyping method to what you actually need to learn from this round.
Skipping the revision log. Without documentation, you cannot tell which version passed testing, what was changed between builds, or why a decision was made. A simple spreadsheet is all you need.
Sending prototype files directly to production manufacturers. A prototype file and a production file are different things. A prototype file is a design in progress. A production file is a finalised, reviewed specification. Never use an untested prototype file as a manufacturing order.
Final Thoughts
The path from sketch to prototype is not a straight line, but it is a predictable one. Every step builds on the last, every test narrows the uncertainty, and every revision brings you closer to a design that works reliably and can be built at scale.
The startups that get to market fastest are not the ones with the biggest engineering teams. They are the ones who define clearly what each prototype needs to prove, execute each stage without over-engineering it, and iterate quickly when they find problems.
If you are at the sketch stage and need support turning your idea into a CAD model, getting a prototype produced, or preparing files that are genuinely ready for manufacturing, the team at Solidus 3D Modeling works with founders and product teams worldwide. We handle every stage of this journey — from rough sketches to production-ready file packages — and every project starts with a signed NDA.
📩 Ready to Take the Next Step?
Send your sketch, brief, or reference images to info@solidus3dmodeling.com
Or use the instant quote form at solidus3dmodeling.com/instant-quote.php
Most projects receive a quote within 24 hours. NDA signed before any work begins.
No CAD experience required — we work from whatever you have.
Frequently Asked Questions
How long does it take to go from sketch to prototype?
A basic looks-like prototype can be ready in five to ten business days from a clear sketch. A functional prototype with tested CAD typically takes three to six weeks, including one or two revision rounds. Production-ready file packages depend on the complexity of the product and how many components are involved.
Do I need to know CAD to get a prototype made?
No. A professional 3D modeling service can build the CAD model from a hand sketch, photographs, measurements, or a verbal description of your product. You provide the concept and intent — the modeler translates it into geometry.
How much does a startup prototype typically cost?
The range is wide. A simple 3D printed single-part prototype can cost under one hundred dollars. A multi-part CNC-machined functional prototype in metal might run from five hundred to two thousand dollars. A vacuum cast batch of ten units in production-like material typically falls between eight hundred and three thousand dollars depending on part complexity and size.
What is the difference between a prototype and a production part?
A prototype is used to test, validate, and iterate. It may be made from a different material, process, or tolerance than the final product. A production part is made from a finalised, DFM-reviewed design using a process that can be repeated consistently and cost-effectively at the required volume.
When should I start thinking about manufacturing?
As early as possible — even at the CAD stage. Designing with manufacturing in mind from the beginning means your prototype iterations are relevant to the production process and you are not designing yourself into a corner. Waiting until you have a finished design and then discovering it is difficult or expensive to manufacture is a very common and avoidable mistake.
What file format does a manufacturer need?
For CNC machining and most manufacturing processes, STEP is the universal standard. For 3D printing, STL or 3MF are the standard formats. Always include a 2D PDF engineering drawing alongside any STEP file for production orders, regardless of the manufacturing method. The drawing communicates what the file alone cannot — tolerances, surface finish, material, and inspection requirements
Published by Solidus 3D Modeling — Professional 3D CAD Modeling, Rapid Prototyping & Manufacturing Services
solidus3dmodeling.com | info@solidus3dmodeling.com | +91 7420866709
© 2026 Solidus 3D Modeling. All rights reserved. Original content — copyright-free for use on solidus3dmodeling.com.
No replies yet
Start the discussion
Be the first to ask a follow-up question or add practical insight about this topic.